To verify the status and specifications of a computer’s graphic card, one can follow several steps that provide comprehensive information about the hardware component. The graphic card, also known as a graphics processing unit (GPU), is crucial for rendering images, videos, and other visual content on your computer screen. It is essential to understand its capabilities and ensure it is functioning correctly for optimal performance, especially for graphic-intensive tasks like gaming or professional design work. Here’s a detailed guide on how to check your computer’s graphic card:
- Access the Device Manager: The Device Manager is a built-in utility in Windows operating systems that allows users to view and manage the hardware devices attached to their computer. Press the Windows key + X and select “Device Manager” from the list. This will open the application, displaying a list of all the hardware components.
- Navigate to Display Adapters: In the Device Manager, you will find various categories of devices. Scroll down and click on the “Display adapters” category to expand it. Here, you will see the name of your graphic card listed.
- Identify the Model and Manufacturer: The graphic card’s model and manufacturer are displayed in the Device Manager. This information is vital for checking compatibility with software, updating drivers, and troubleshooting issues. Take note of these details for future reference.
- Check Drivers and Update if Necessary: By right-clicking on the graphic card and selecting “Properties,” you can access the driver details. The “Driver” tab will show you the current driver version and date. It is important to have the latest drivers for the best performance and stability. If an update is available, you can either update it through the Device Manager by clicking “Update Driver” or visit the manufacturer’s website for the most recent driver release.
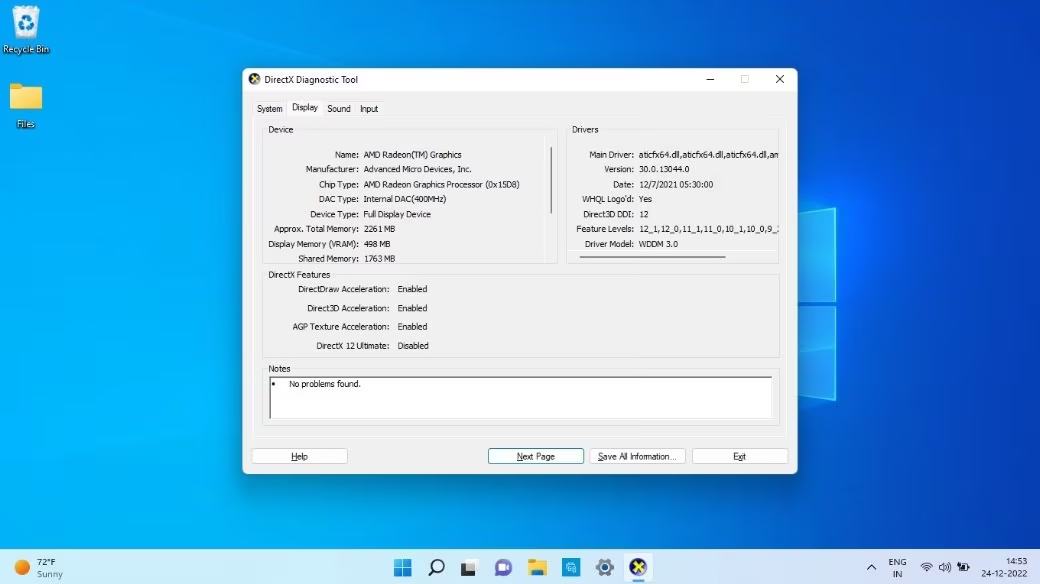
- Examine System Information: Another way to check your graphic card is through the System Information utility. Press the Windows key + R, type “msinfo32,” and hit Enter. This will open the System Information window. On the left-hand side, navigate to “Components” and then “Display.” This section will provide you with more detailed information, including the card’s model, manufacturer, and the amount of video memory installed.
- Use Third-Party Software: There are numerous third-party applications that offer detailed insights into your graphic card’s performance and specifications. Programs like GPU-Z, Speccy, and HWiNFO are popular choices. These tools can provide you with information such as the GPU’s clock speed, memory type, and temperature, which are useful for troubleshooting and monitoring the card’s health.
- Open the Computer Case: For a visual inspection, you may need to open your computer’s case. This step is optional but can be beneficial for checking the physical condition of the card, such as dust buildup or proper seating in the PCI-Express slot. Turn off your computer, unplug it, and use an anti-static wrist strap to prevent damage to the internal components. Locate the graphic card, which is typically a large, rectangular component with a fan attached to it.
- Run Diagnostic Tools: Some graphic card manufacturers, like Nvidia and AMD, offer diagnostic tools. For Nvidia cards, you can use the Nvidia System Diagnostic Tool, while AMD users can rely on the AMD Radeon Software’s “Performance” tab. These tools can help you identify any issues with the card and offer potential solutions.
- Benchmark Testing: To evaluate the performance of your graphic card, consider running benchmarking software such as 3DMark, Unigine Superposition, or Cinebench. These programs test the GPU’s capabilities and provide a score that you can compare with other users’ results to gauge your card’s performance relative to similar models.
- Check System Requirements for Software: When installing new software, especially games, it’s essential to verify whether your graphic card meets the minimum and recommended system requirements. This can prevent poor performance and ensure you get the most out of your applications.
- Monitor Performance During Use: While using graphic-intensive applications, pay attention to any signs of lag, stuttering, or screen tearing. These symptoms might indicate that your graphic card is not performing optimally or that it’s struggling to meet the demands of the software.
- Troubleshoot Issues: If you encounter problems, you can troubleshoot by checking for driver conflicts, updating other system components, or checking the power supply to ensure it’s delivering enough power to the graphic card.
In conclusion, regularly checking your computer’s graphic card can help maintain optimal performance and prevent potential issues. By following these steps, you can ensure that your GPU is functioning correctly and is suitable for the tasks you wish to perform. Keeping the drivers updated and monitoring the card’s performance can significantly improve your computing experience.